| « | On Upgrading an Air Top 2000S |
» |
We (by which I mainly mean Beth) have spent the last three days replacing the warm air heater on Florence, our camper van and I thought I should share our experiences1. Florence is a 2005 Trigano Tribute, a very popular model based on a long wheel base high top Fiat Ducato van, and it comes factory fitted with Webasto Air Top 2000S warm air heater.
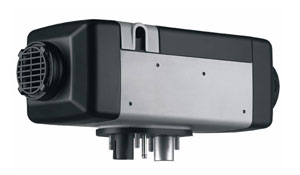 The way the Air Top 2000S works is that it burns diesel and uses that to warm cabin air via a heat exchanger which is blown around the inside of the van through vents at various places close to the floor.
The existing unit was nine years old and Beth had been using it pretty hard for the last three winters on WalkLakes and last winter it started smoking very badly when starting which meant the fuel wasn't igniting properly during the start up stage. This is a known problem and the solution is a strip down and re-build.
We weren't keen on that. Instead we opted to replace the unit. The Air Top 2000S is no longer in production but the Air Top 2000ST appeared to be identical as far as we could see and they're available new on eBay for £680.
So we bought one and Beth made a start fitting it. As far as I can make out getting the old unit off Florence was straightforward enough although working overhead is never a lot of fun. I think the biggest problem she had was with the exhaust being very securely cemented to the heater.
However we ran into difficulties when Beth looked at the wiring. The Air Top 2000S had two sockets connecting it to the main loom, the Air Top 2000ST had one, but with a lot more pins.
Much scratching of heads and looking at circuit diagrams. Were we going to have to strip out the existing loom and completely rewire? That would be a nightmare. As it turned out we didn't need to. It was easy enough to take the expensive end of the new Air Top 2000ST loom, with the fancy plug on, cut if off along with the last 18" or so of wire (noting 5/7 below!) and then patch this into the existing loom having chopped off the existing plugs from that (only one of which was actually in use it turned out). This way we ended up with the fancy new plug on the end of the old loom ready to plug into the 2000ST.
Here's a quick crib (the plug is called X6 if you look at the circuit diagram):
| 1 | red | power wires: patched to corresponding thicker power wires in loom |
| 2 | brown | |
| 3 | violet | not connected. |
| 4 | grey | not connected. |
| 5 | green/white | 5 & 7 are already patched to a plug called X8. Make sure that you don't chop that off. It's for adjusting CO2. |
| 6 | - | |
| 7 | brown/white | |
| 8 | black/blue | 8 & 9 are connected by a resistor2. You can find this wrapped under the covering at the far end of the loom so you need to uncover that, cut the wires and then reconnect 5 and 7 together across the resistor |
| 9 | yellow | |
| 10 | blue | heater controller wires: patched to corresponding wires in loom of same colour |
| 11 | white | |
| 12 | black | |
| 13 | red | |
| 14 | black/red | not connected3 |
| 15 | - | |
| 16 | white/red | not connected4 |
| 17 | - | |
| 18 | - |
So in essence it's mostly masking off wires. There's six wires to patch to the old loom, all colour matched which keeps it pretty simple, and two wires (8 & 9) to keep looped through their resistor.
The other part which caused Beth a lot of grief, although your mileage may vary, was re-fitting the warm air pipe and even now we're not convinced it's very secure however at about 3pm today Beth fired up the 2000ST for the first time (while I stood by with a fire extinguisher) and it whispered into life first time.
It's a real pleasure to have it running. So much quieter than the old one ... and no trace of smoke.
Result!
- This article is largely Google fodder aimed at others who end up on the same path so both of my regular readers should feel free to skip on.
- This appears to be because you can equip the 2000ST with an external temperature transducer, which goes on across these two wires. Presumably the resistor keeps the 2000ST happy if you don't have one.
- OEM fan. Looks like this allows the 2000ST to control the vehicle ventilation fan.
- This wire controls the ventilation option. If it's grounded then the fan will run without the heater operating.
| Tags: WalkLakes | Written 21/08/14 |
|
On
09/09/14
at
9:34pm
David Wright
wrote:
You could have saved money and made your life easier by just buying a bare heater and part # 9025486A adapter loom, this is the way I do it for customers and it takes about an hour to swap out. |
|
On
09/09/14
at
11:07pm
Paul
wrote:
D'oh. Now he tells us :-) |
|
On
03/04/15
at
4:56pm
Rob F
wrote:
What size is the resistor, or what colour markings does it have? Thanks |
|
On
03/04/15
at
5:11pm
Paul
wrote:
Sorry, I didn't make a note of that and it's buried in the loom again now. The circuit diagram in the manual just labels it as R1 and in the key it says "With internal temperature sensor only" (which is why I wrote what I wrote above). |
| « | » |

